Tuesday, April 26, 2016

"BLOOM" Sew Along, Block 6. And "Nesting"...Not Just for the Birds!

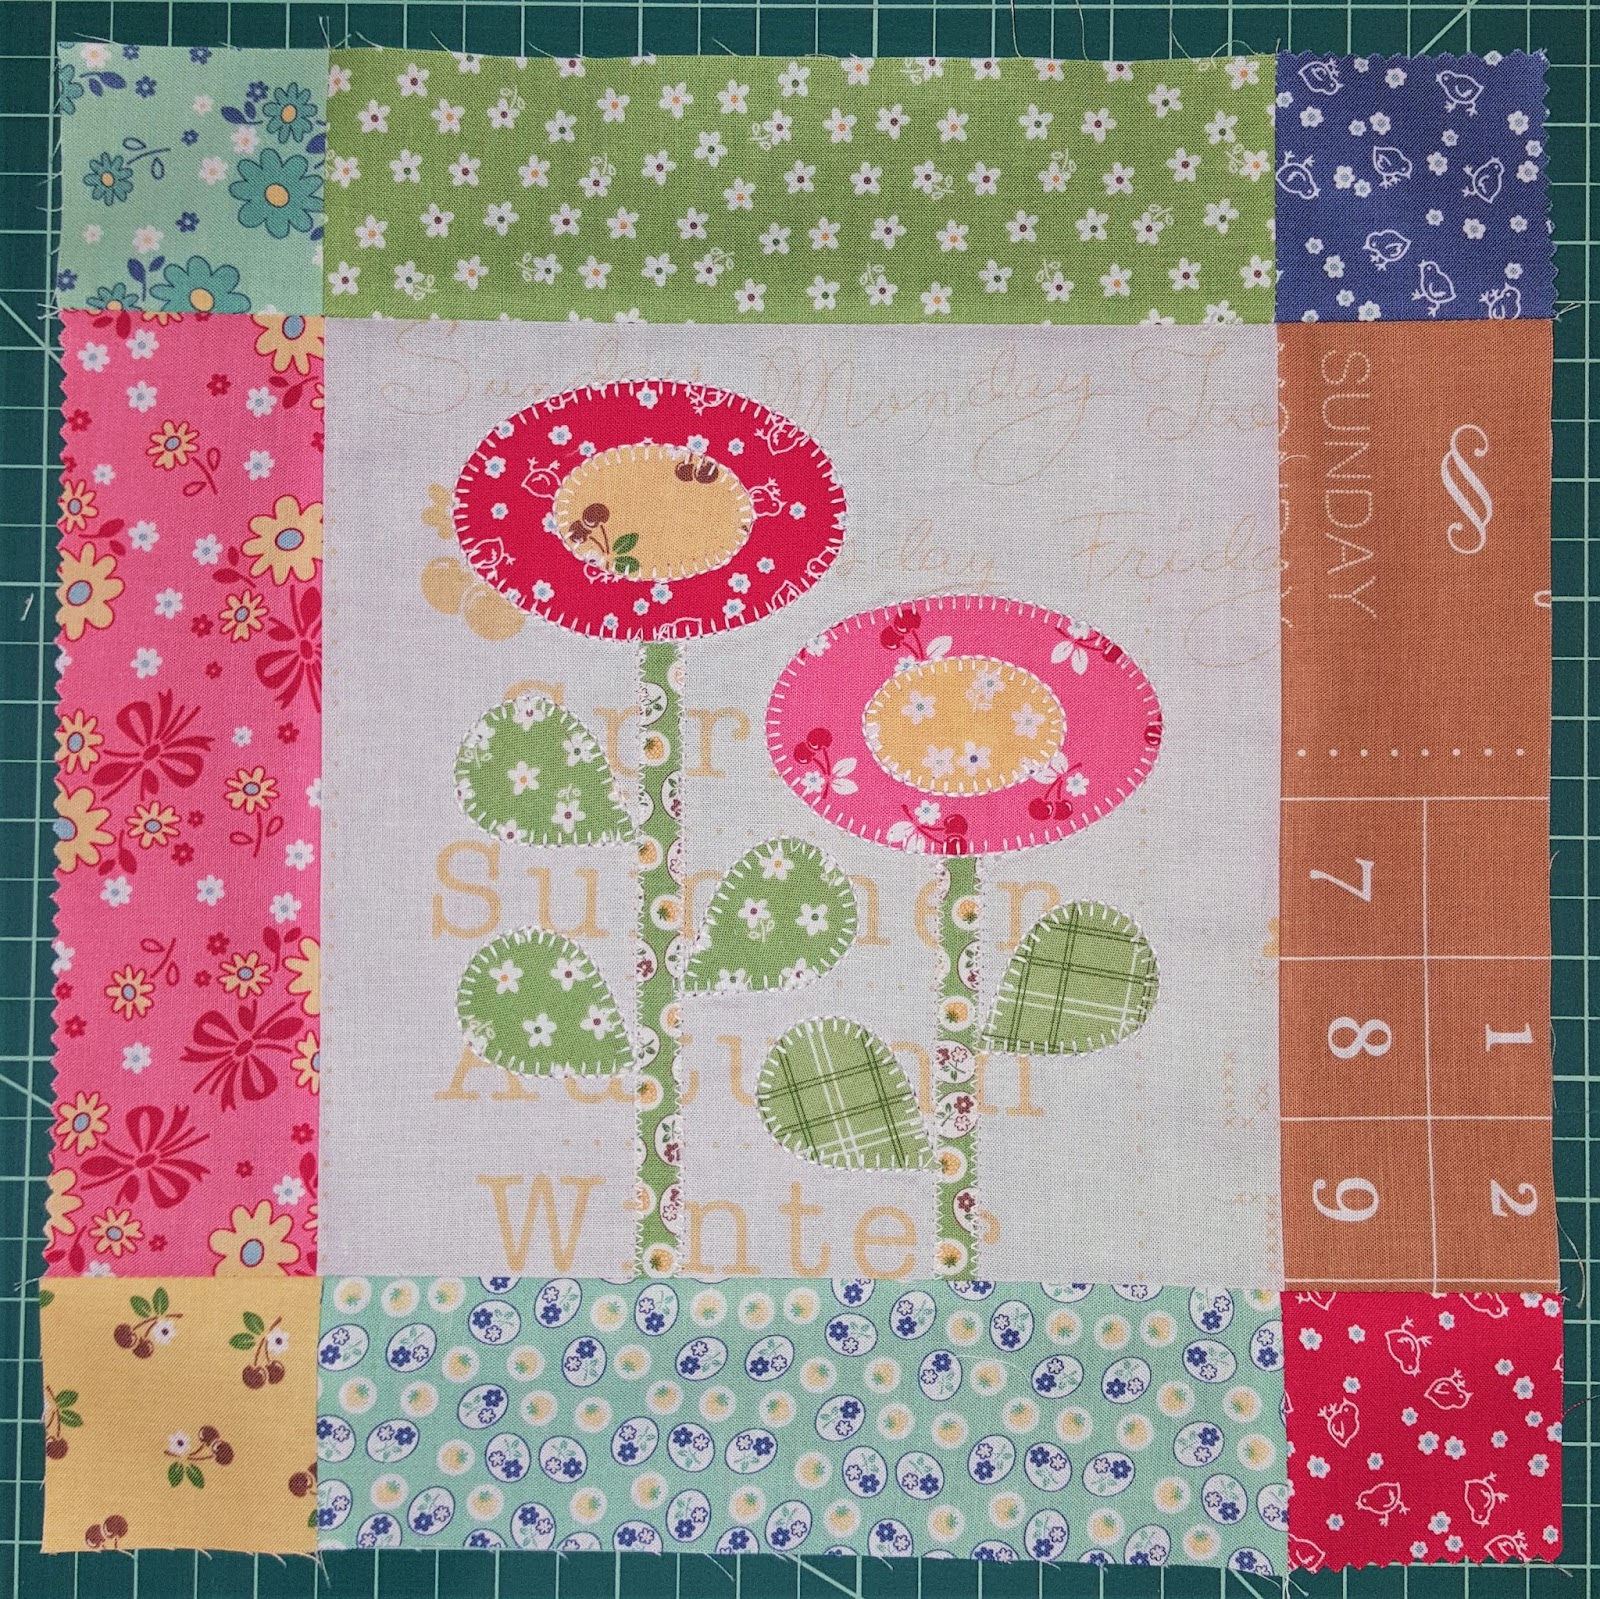
"BLOOM"ing right along on Lori Holt's Sew Along, here's Block 6:
Credit: "Bee in My Bonnet".  Click the pic for Lori's tutorial.
I LOVE this flower!  I really wanted to make the petals white, like a real daisy, but of course it wouldn't work against the background.

Here are my fabric choices for this one:

And then I did my standard trace shapes onto Steam a Seam, rough cut out, stick onto wrong side of fabric, press, cut precisely, arrange, press again, then applique!


Ready for applique!
Applique done!
After this step, I square up the block before adding the border rectangle and squares.  This time, I figured I would show you how I try to make sure my seams all line up so I don't have a wonky frame for my cute little block!

In this pic, I have already sewn my "rows" together, and I pressed them.  I hope you can see how I pressed the top and bottom row seams inward, and the middle row seams outward.  This is so 1) the colored seams don't show up on the white background square, and 2) my seams will "nest", thus helping them lock together.

What is "nesting"?  It's a thing I first learned from Jenny Doan at Missouri Star Quilt Co where basically you plan ahead and press the seams of your rows so that they go in opposite directions.  She demonstrates it in MANY of her fantastic tutorials, so click that link to check out some if you haven't already.  

The thing about Jenny is that she just nests her seams with her fingers, and then just happily sews together a perfect block right before your eyes.  Unfortunately, I do not have her skill, so my block seams would be close, but would still be off, causing me much frustration.  I figured I would just improve with time and practice.

Then bought a Craftsy class called "Pre-Cut Piecing Made Simple" by Camille Roskelley of "Thimble Blossoms" and of "Bonnie & Camille" fabrics.  Camille has a very different style than Jenny does; not better or worse, just different.  And she pins.  A lot.  Jenny doesn't pin.  But the way Camille pins seams was life-changing for me.  I highly recommend buying this class, not only for her fabulous infamous "Swoon" Block pattern you get as part of the class, but for all of the tips and tricks she gives along the way.  BTW, I am addicted to "Bonnie & Camille" fabric, and I love that this is a mother-daughter design team!

So anyway, Camille will plan ahead to "nest" her seams as well.  But she adds a pin down the center of where the seams intersect.  And by doing that, the seam will not move when it is sewn.

Freakin' brilliant!!  I am using very fine (.5mm), long glass-head pins by Dritz which I found on Amazon HERE.  After using these babies, "normal" pins feel like toothpicks to me...I suggest you get some.

So when the two seams are nested and pinned, they look like this:

I also added an extra pin mid-way through the rectangle, because why not?  I actually keep my pins in when they go under the needle, although some peeps will tell you to pull them out right before they reach the needle.  You do whatever you want.

What's funny is that I used to not pin because I thought it took too much time, work and effort, but now I do it all the time without a second thought; it's just part of my process now and the results are worth it.  If there's one thing quilting taught me, it's that investing the time and effort on the front end will pay invaluable dividends in the finished product...and yes, that applies all the way back to starching and pressing your yardage before you even cut it.  

And, here are my pretty-darn-close-to-almost-perfect seams:

No, not perfect, but way better than if I had not pinned those seams.  And as Jenny says, finished is better than perfect! :-)

Saturday, April 23, 2016

"BLOOM" Sew Along, Block 5

It's the weekend, and after doing chores and doing stupid car maintenance stuff, I finally got some time to quilt!! :-)  

I got in gear and finished Block 5 of Lori Holt's "Bloom" Sew-Along.

Credit: "A Bee in My Bonnet". Click the pic for Lori's tutorial.
Here are the fabrics I chose.  I didn't like the mint stems and leaves, so I went with green ones instead:

So I traced the templates onto Steam a Seam...

 rough-cut them out, stuck them to the backside of the fabrics...

 pressed to set the glue, trimmed them up exactly, and then arranged them on the background square...

Added applique, again outlining in gawd-awfully slow blanket stitch, except using zig-zag stitch for the stems:

Added the framing scrappy strips, and Block 5 is done!

Now, on to Block 6!

Monday, April 18, 2016

1 Year Ago Today...

Apparently, I enjoy pain.  This explains why in October of 2014, I began a Master of Arts in Management degree program at the University of Redlands.  4 hours of classroom instruction every. single. week.  Along with my full-time day job as an HR manager.  No breaks, just 18 continuous brutal months chock full of reading, writing, and lecture.  So so painful, not just for me, but for my family who had to learn how to live without my attention, not to mention a sleep-deprived grouchy version of my normal self, for a year and a half.

But this was a goal I had set for myself, and as they say, "The Tassel is Worth the Hassle".  I was so incredibly proud of myself when I  participated in commencement on April 18, 2015, 1 year ago today!  There were times, about half-way through, when I seriously wanted to quit.  Seriously, I was soooo tired, and I wanted my life back!  But I dug deep, put on my big girl panties, and did it!
Back of my cap!

Selfie from the back row

Finally in my hot little hand!

So set your goals, and work hard to achieve them!
And with all the free time I had after I was done, I taught myself to quilt! :-)

Ren Faire Fun

I got my noble outfit done in time for the 2nd weekend of the Southern California Renaissance Pleasure Faire!  Here it is the night before:
 Sorry for the weird angle...hubby is quite a bit taller than me :-)

And, here is my Best Buddy and me, enjoying the warm California sun:


Well, the sun was SWELTERING, especially when you're covered in a court gown made of yards of cotton velvet.  But we got compliments from some court ladies who were really for real, and that made it all worth it! :-)

Saturday, April 16, 2016

"BLOOM" Sew Along, Block 4...and Ren Gown Update

Hiya!  I'm "Bloom"ing right along, and got Block 4 of Lori Holt's Sew Along done!
Credit: "A Bee in My Bonnet". Click the pic to see Lori's tutorial.
This one looked pretty straight-forward with only a few pieces, so I was stoked to get started.  I picked my fabrics, which ended up being close to the pattern suggestions, traced my templates and then rough-cut my Steam a Seam 2:

I really love the dark blue fabric with the yellow cherries...I may need to buy yardage!  And those adorable chicks on the yellow!?!  OMG, this is my favorite color-combo yet!  This fabric line is just perfectly cute!  

So after sticking the SAS2 to the back of each fabric piece, I mocked them up, and pressed them into place:
  
Added blanket stitch applique, except for the stem, which got zig-zagged.  That stitch works so much better on the stems than the blanket stitch!

Squared it up, picked some border fabric, and framed this bad boy:

So cute, and relatively painless!  This block completes one row of the quilt, so I just had to have a preview:

LOVE it!  I'm planning on sashing each block with 1" of the white background fabric...I kinda want to highlight each block separately, and I think the patchwork-y double borders need to be broken up in order to do that.  Also, I may tweak the final layout and/or add more blocks, so I won't be sewing my blocks together until the end.  If you check out Lori's blog (and you really should!), she has posted bonus flower patterns/ideas for using her "Bloom Sew Simple Shapes" templates, and they are super-adorable:
Credit: "A Bee in My Bonnet".  Click the pic for Lori's tutorial.
I love those patchwork flowers!  Lori is a true creative genius, and her ideas are awesome, but she really does a fantastic job of explaining to us mere mortals how easy her methods are, and then she actually takes the time to teach them...you can just tell that she wants to help peeps make pretty things!  I may be slightly crushing on her!  But seriously, her hard work should be recognized, and I hope that anyone reading this knows it!  Afterall, she's the reason I'm trying applique for the first time and getting such great results!  So check out her blog and buy her stuff in her Etsy shop!  

Unfortunately, Block 5 is going to have to wait a bit, because I have to finish up my Ren Faire outfit...my friend and I are going tomorrow!  Since my last post, I was able to make a square-necked chemise (a first for me), and detachable sleeves to match my green underskirt/forepart fabric (overskirt not shown):
So my costume is pretty complete.  I just need to sew that trim to the top of the bodice, and maybe add the brown beads to the front, if I have time.  I still need to make a bag, some type of hat, and I need a feather fan.  At this point, I'm really over working on this thing....it's been 4 years in the making.  So I hope to have some really cool pics for you tomorrow!

Friday, April 15, 2016

"BLOOM" Sew Along, Block 3

So now on to Block 3 of Lori's Holt's fantabulous "BLOOM" Sew Along.  I'm still way behind, but I'm making progress:
Credit: "A Bee in My Bonnet". Click the pic for Lori's tutorial.
I am already dreading the blanket stitch around those oval flowers!  It's really slow-going around the curves!  Anyway, I picked out my fabrics, and stuck pretty close to the pattern suggestions:

Then I traced the template shapes onto the Steam a Seam 2:

Pookie helped immensely in this process:

After sticking the shapes to the fabric, lightly pressing, then carefully cutting them out, I arranged them like Lori says to:

For this block, I decided to try zig-zag stitch on the stems instead of the thick blanket stitch.  It worked a lot better, and I'll probably be using that technique moving forward on this quilt.  For any future applique projects, I will be zig-zagging...blanket stitch, although cute, is a major pain to sew.  

So I appliqued, squared up, added borders & corners, and viola, Block 3 is done:

Onward to Block 4!  Ever onward!!

Sunday, April 10, 2016

"BLOOM" Sew Along, Block 2

I love lazy, cold and rainy Sundays like today!  The gloomy weather really gets me in the mood to get into comfy sweats, stay inside and do lots of crafty, creative things.  I don't know why, but I love this weather!

So I finished my first "Bloom" Sew Along Block earlier today.  And I was so inspired, I went ahead and made Block 2.  
Credit: "A Bee in My Bonnet". Click the pic for Lori's Tutorial.
Now that I've figured out what I'm doing, and I've set up a little method for my madness, it seems a lot easier to get these done!  So I picked out my fabrics, which are very similar to the pattern:

So after doing all the tracing, pressing, peeling, and sticking, I followed Lor's directions and put this together:

I made the stems thicker than called for, since my first block's stem was completely overwhelmed by the blanket stitch.  However, maybe this is just too thick.  Sigh!

So I did a bunch more blanket stitch to applique this block:

I'm beginning to think that the blanket stitch is just a tad...much.  It seems like it is taking away from the detail of the block.  Hopefully, when it's all put together, the stitching will just blend in.  Hopefully.  Next time I do applique, I'll opt for a light zig-zag stitch.

Slapped some framing on it, and it's good to go:


Here are my two blocks, together!  I really love how they've turned out.  Not too bad for my first stab at applique!

Still got 10 more to catch up on, though!

"BLOOM" Sew Along, Block 1!

I've never participated in a Sew Along.  I've never done quilt applique.  However, Lori Holt of "A Bee In My Bonnet" has enticed me to try both.  At the same time.  Check this out, and you'll know why:
Credit: "A Bee In My Bonnet". Click the pic for all of the deets on Lori's blog!
Isn't it just sooooo cute?!?  Like, OMG, I almost can't stand looking at it CUTE!!  So, here's a cute (I know, enough with the "cute", but it is!) little banner Lori posted.  I'm going to use it!
So this Sew Along started back in January, and they are already on Block 12.  Lori posts a new block tutorial every Monday.  That means that Block 13 will be out tomorrow.  I'm woefully behind, but I want to catch up and sew with the group.  Well, gotta start at the beginning:
Credit: "A Bee in My Bonnet". Click the pic for Lori's tutorial
If you haven't already noticed, I like to do my own thing and be different, which is probably why I haven't done a "craft along" thang before now.  So I've already decided that I don't want to do the double border effect that happens when you join two of these lovely blocks together.  I'm going to make the framed blocks, but will sash them with an inch of white background fabric in between.  Yeah, that's what I'll do!

I have a layer cake of Lori's super duper...er...cute fabric "Calico Days", not the fat eighths the pattern calls for.  And actually, that will work out just fine for my plans.

Here's how I'm organized, which is a gigantic feat for me because I am NOT organized.  Lori's a genius, and she gives little priceless idea gems throughout her blog posts, like how to organize the Bloom template shapes, and how she keeps all of her project stuff in a dedicated binder.  So call me a copy-cat, but I'm doing it too!  
I cut each of my layer cake pieces so that I would have (2) 8.5"x2.5" rectangles & (2) 2.5"x2.5" squares of each piece.  That means that I would have a total of 80 rectangles and squares (on the right), which is enough to frame all 20 Bloom blocks.  Worked perfectly with a layer cake. The left-over fabric (on the left) should be enough for all of the flower shapes.  If not, I have some fat quarters from Lori's "Modern Minis" collection which will coordinate.  But I'm pretty sure  I should be cool.

OK, I got this!  After reading the blog post several times, watching the video Lori made, and checking out the Block One's on Instagram that other talented peeps have made, I picked out my fabrics:
I totally ripped off others' ideas and am making a sunflower.  Because I love sunflowers!  It's so fantastic when creative people share ideas...I would never have thought of it on my own, and now I get to make a sunflower!  

Although Lori does a bang-up job of explaining how to do her method of applique, and it looks really easy, I'm actually going to use some Steam-a-Seam 2 to do fusible applique.  So for that stuff, you trace the templates onto the gridded paper side of the SAS2, rough cut it out, tear off the opposite paper side of SAS2, and stick it on the wrong side of your fabric.


Then, you give it a quick press with the iron to set the glue onto your fabric.  The SAS2 packaging instructions don't tell you this, but helpful crafty peeps in blogland and on YouTube know all about it, and I thank the stars they saw fit to share this vital info.  Because if you don't press your pieces at this stage, the glue doesn't transfer to your fabric, and that's kinda the whole point.

I briefly pressed my pieces on a teflon pressing sheet to protect my ironing pad from getting sticky gunk on it.  After that, I precisely cut the shapes out of the fabric, and then peeled the paper backing off, yielding a sticky fabric shape.  I was easily able to place and stick my pieces as per Lori's instruction...YAY for no basting little flower bits!

Looks pretty good!!  So after much trial and error, and lots of practice, I decided on a blanket stitch in white thread for all my of applique sewing.  Lori suggests matching thread, but I'm just too lazy for that.  Maybe for the up-coming "Cozy Christmas" Sew Along!

My only issue during applique was that my needle got gunky, and started skipping stitches!  Yup, the SAS2, whose packaging clearly states that it will not gum up a needle if you sew through it, almost made me throw my sewing machine out the window.  

After a deep breath and a new needle, I was able to finish my applique:
I'm going to have to make my stems wider for future flowers.  But I like it!  It's shabby and charming!  Next, to square it up (down?) from 9" to 8.5", I used my 12" square ruler with tape marking 8.5".  To make sure it was square, I lined up the ruler's 45 degree line w/my cutting mat's 45 degree line.  Like this:

Trimmed this baby up (down), picked some pre-cut framing rectangles and squares from my handy-dandy binder sleeve, and voila, I done did an applique quilt block!
Block One DONE!
  Woot woot!  Okay, can't gloat too long, I gotta start Block Two!