Showing posts with label steam a seam. Show all posts

Thursday, June 2, 2016

I've Been Busy, and "BLOOM" Blocks 10 & 11

After finishing that quilt for my SIL, I've found myself at that awkward point of relief that the large project is FINISHED, but kind of confused about what do work on next.  There are so many things/techniques/patterns I want to try!!

But I went back and worked on some projects in process.  I did some "Bloom" Blocks, numbers 10 and 11:


And here is my "Bloom" quilt thus far:

I also took this lull in the action to try my hand at making gifts for my son's teachers.  Totes are always cool, right?  So I hopped over to Missouri Star Quilt Co., followed Jenny's tutorial on making a tote from charm squares, and came up with these beauties:

I used Pellon Flex Foam (fusible) instead of the batting, and I really LOVE that stuff for bags!  As you can see, the bags stand up on their own, and the handles are really cushy too.  I'm going to have to make myself one too!

I also started a baby quilt for an expectant co-worker:

Just need to border it with red, then bind with black, and it'll be done!  I've got some left-over aqua Soft N Comfy fabric to use for backing, which will be absolutely perfect!

Also, my "bonus" quilt blocks are at the point where I actually need to figure out something for them to become.  I decided on 1" (finished) red/tomato sashing to start with:

Pookie helped with the lay-out
Still gotta sew into rows, then sash the rows.  I LOVE this simple little quilt!!  This is my first time trying colored sashing, and I really like how it frames the pale-ish blocks.

And lastly, I made this adorable "camera" bag for my son's hockey coach's daughter, who is their "Assistant Coach".  She loves photography, so I'm hoping she'll like this:


This was based on THIS tutorial for an Instagram camera bag by Living DIY Style.  I really liked how this came out, except next time I will attach fabric at both ends of the zipper so that I sew through the fabric, rather than the zipper, for a nicer finish.  Live and learn!

So, I still don't have a new quilt top in the works, but maybe I'll take this opportunity to finish some that have been languishing around for awhile.  I think I'll post those next, to hopefully shame myself into finishing them up.  ;-)

Sunday, May 8, 2016

"BLOOM" Sew-Along, Block 9 - My Style!

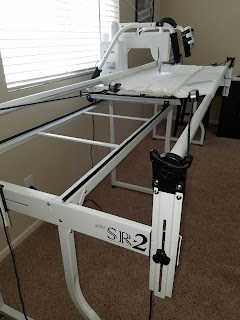
Today is Mother's Day, and my super-thoughtful husband "bought" (meaning we both decided) me a Grace SR-2 quilting frame for my Brother PQ 1500SL machine! 

I was really excited until I had to start figuring things out, like ideal thread tension, foot height, speed, quilt tension, quilt height, etc., since my thread kept skipping and breaking.  A lot.  I even did some FMQ on the machine by pushing a sample quilt around under the needle, just to make sure it still worked.  It did.  But I learned that I just need to slow waaaay down on the frame, and I had to adjust the afore-mentioned tensions, one at a time.  Once I did that, my practice designs started getting better, with only a very occasional skipped stitch, which is still driving me nuts!  But then, as I was just starting to get into my quilting groove, my machine started just turning off randomly.  I oiled it, and gave it and me a break and decided to make my Bloom block.  

Yes, I'm still plugging away at my Bloom quilt..I think I'm 7 weeks/blocks behind Lori at this point.  As I mentioned in my previous post, I will be replacing the "X" shaped blocks with a design of my own making.  Block 9 is supposed to be this:
Credit: "A Bee In My Bonnet". Click the pic for Lori's tutorial.
Instead, I'm going to make a patchwork flower, like this:

So, here's my applique process using Lite Steam-a-Seam2:
Pick fabrics, trace the templates onto the SAS2, cut out the shapes, stick them to the wrong side of the fabric, cut them precisely, peel off the paper backing, and stick the shapes to the background fabric.  This time, I had to sew some fabrics together for the patchwork so I could then cut out the circle shape and the leaves:

The purty patchwork flower, all ready to applique:

I did my blanket stitch around everything, except for the zig-zag on the stems, picked out some borders, and here is my Block 9:

I think it's really cute, if I do say so myself! :-)


Thursday, May 5, 2016

"BLOOM" Sew Along, Block 8...Well, Kinda

 So I should be doing this block for number 8 in Lori Holt's "Bloom" Sew Along:
Credit: "A Bee in My Bonnet".  Click the pic for Lori Holt's tutorial.
The design is pretty, but I've decided that I want to keep with the theme of flowers that actually look planted; unfortunately for this block, it doesn't look like a planted plant.  So, I created alternate designs for all 4 of the blocks in the quilt that have this "X" configuration, and I will replace those.  Yes, this means that I will be re-doing Block 2.

So I grabbed my graph paper, and came up with some what I think are cool designs, using this post from Lori's blog as inspiration.  Here's what I decided on for Block 8:
  
These flowers remind me of daffodils, so I chose fabrics that go along with that notion:

I did my template-tracing, Steam-a-Seam cutting, pressing, precision shape-cutting, and finally arranging.  I pressed the background square in half, and placed the stems so that they intersected at the half-mark.  

How cute, right?  Here's how close I came to the original vision:

I'm pretty proud of how these came out!  So after some applique:

And after the borders:

I'm all done with my alternate Block 8!  Because Block 9 is also a non-planted flower design in the pattern, check in later to see what I came up with as a replacement design... ;-)

Tuesday, May 3, 2016

"BLOOM" Sew Along, Block 7

I'm still plugging along on the "Bloom" quilt by Lori Holt of "A Bee In My Bonnet", and I am up to Block 7:

Credit: "A Bee In My Bonnet".  Click the pic for Lori's tutorial.
I thought I would be too cool for school, and just followed the pattern directions for the block without looking at the tutorial first.  As a result, I made a blue flower with a yellow center, as instructed in the pattern.  But when I saw the block that Lori had actually made on her blog, I was so jealous!  Just look at Lori's fabric choices for her block!  So cute!  I hereby vow to deviate from the pattern more often.

Okay, so I traced, cut, pressed and appliqued my way to a finished block:


Pretty painless, and it's so cute!

Tuesday, April 26, 2016

"BLOOM" Sew Along, Block 6. And "Nesting"...Not Just for the Birds!

"BLOOM"ing right along on Lori Holt's Sew Along, here's Block 6:
Credit: "Bee in My Bonnet".  Click the pic for Lori's tutorial.
I LOVE this flower!  I really wanted to make the petals white, like a real daisy, but of course it wouldn't work against the background.

Here are my fabric choices for this one:

And then I did my standard trace shapes onto Steam a Seam, rough cut out, stick onto wrong side of fabric, press, cut precisely, arrange, press again, then applique!


Ready for applique!
Applique done!
After this step, I square up the block before adding the border rectangle and squares.  This time, I figured I would show you how I try to make sure my seams all line up so I don't have a wonky frame for my cute little block!

In this pic, I have already sewn my "rows" together, and I pressed them.  I hope you can see how I pressed the top and bottom row seams inward, and the middle row seams outward.  This is so 1) the colored seams don't show up on the white background square, and 2) my seams will "nest", thus helping them lock together.

What is "nesting"?  It's a thing I first learned from Jenny Doan at Missouri Star Quilt Co where basically you plan ahead and press the seams of your rows so that they go in opposite directions.  She demonstrates it in MANY of her fantastic tutorials, so click that link to check out some if you haven't already.  

The thing about Jenny is that she just nests her seams with her fingers, and then just happily sews together a perfect block right before your eyes.  Unfortunately, I do not have her skill, so my block seams would be close, but would still be off, causing me much frustration.  I figured I would just improve with time and practice.

Then bought a Craftsy class called "Pre-Cut Piecing Made Simple" by Camille Roskelley of "Thimble Blossoms" and of "Bonnie & Camille" fabrics.  Camille has a very different style than Jenny does; not better or worse, just different.  And she pins.  A lot.  Jenny doesn't pin.  But the way Camille pins seams was life-changing for me.  I highly recommend buying this class, not only for her fabulous infamous "Swoon" Block pattern you get as part of the class, but for all of the tips and tricks she gives along the way.  BTW, I am addicted to "Bonnie & Camille" fabric, and I love that this is a mother-daughter design team!

So anyway, Camille will plan ahead to "nest" her seams as well.  But she adds a pin down the center of where the seams intersect.  And by doing that, the seam will not move when it is sewn.

Freakin' brilliant!!  I am using very fine (.5mm), long glass-head pins by Dritz which I found on Amazon HERE.  After using these babies, "normal" pins feel like toothpicks to me...I suggest you get some.

So when the two seams are nested and pinned, they look like this:

I also added an extra pin mid-way through the rectangle, because why not?  I actually keep my pins in when they go under the needle, although some peeps will tell you to pull them out right before they reach the needle.  You do whatever you want.

What's funny is that I used to not pin because I thought it took too much time, work and effort, but now I do it all the time without a second thought; it's just part of my process now and the results are worth it.  If there's one thing quilting taught me, it's that investing the time and effort on the front end will pay invaluable dividends in the finished product...and yes, that applies all the way back to starching and pressing your yardage before you even cut it.  

And, here are my pretty-darn-close-to-almost-perfect seams:

No, not perfect, but way better than if I had not pinned those seams.  And as Jenny says, finished is better than perfect! :-)

Saturday, April 23, 2016

"BLOOM" Sew Along, Block 5

It's the weekend, and after doing chores and doing stupid car maintenance stuff, I finally got some time to quilt!! :-)  

I got in gear and finished Block 5 of Lori Holt's "Bloom" Sew-Along.

Credit: "A Bee in My Bonnet". Click the pic for Lori's tutorial.
Here are the fabrics I chose.  I didn't like the mint stems and leaves, so I went with green ones instead:

So I traced the templates onto Steam a Seam...

 rough-cut them out, stuck them to the backside of the fabrics...

 pressed to set the glue, trimmed them up exactly, and then arranged them on the background square...

Added applique, again outlining in gawd-awfully slow blanket stitch, except using zig-zag stitch for the stems:

Added the framing scrappy strips, and Block 5 is done!

Now, on to Block 6!

Saturday, April 16, 2016

"BLOOM" Sew Along, Block 4...and Ren Gown Update

Hiya!  I'm "Bloom"ing right along, and got Block 4 of Lori Holt's Sew Along done!
Credit: "A Bee in My Bonnet". Click the pic to see Lori's tutorial.
This one looked pretty straight-forward with only a few pieces, so I was stoked to get started.  I picked my fabrics, which ended up being close to the pattern suggestions, traced my templates and then rough-cut my Steam a Seam 2:

I really love the dark blue fabric with the yellow cherries...I may need to buy yardage!  And those adorable chicks on the yellow!?!  OMG, this is my favorite color-combo yet!  This fabric line is just perfectly cute!  

So after sticking the SAS2 to the back of each fabric piece, I mocked them up, and pressed them into place:
  
Added blanket stitch applique, except for the stem, which got zig-zagged.  That stitch works so much better on the stems than the blanket stitch!

Squared it up, picked some border fabric, and framed this bad boy:

So cute, and relatively painless!  This block completes one row of the quilt, so I just had to have a preview:

LOVE it!  I'm planning on sashing each block with 1" of the white background fabric...I kinda want to highlight each block separately, and I think the patchwork-y double borders need to be broken up in order to do that.  Also, I may tweak the final layout and/or add more blocks, so I won't be sewing my blocks together until the end.  If you check out Lori's blog (and you really should!), she has posted bonus flower patterns/ideas for using her "Bloom Sew Simple Shapes" templates, and they are super-adorable:
Credit: "A Bee in My Bonnet".  Click the pic for Lori's tutorial.
I love those patchwork flowers!  Lori is a true creative genius, and her ideas are awesome, but she really does a fantastic job of explaining to us mere mortals how easy her methods are, and then she actually takes the time to teach them...you can just tell that she wants to help peeps make pretty things!  I may be slightly crushing on her!  But seriously, her hard work should be recognized, and I hope that anyone reading this knows it!  Afterall, she's the reason I'm trying applique for the first time and getting such great results!  So check out her blog and buy her stuff in her Etsy shop!  

Unfortunately, Block 5 is going to have to wait a bit, because I have to finish up my Ren Faire outfit...my friend and I are going tomorrow!  Since my last post, I was able to make a square-necked chemise (a first for me), and detachable sleeves to match my green underskirt/forepart fabric (overskirt not shown):
So my costume is pretty complete.  I just need to sew that trim to the top of the bodice, and maybe add the brown beads to the front, if I have time.  I still need to make a bag, some type of hat, and I need a feather fan.  At this point, I'm really over working on this thing....it's been 4 years in the making.  So I hope to have some really cool pics for you tomorrow!